Meccanoid Servo Motors
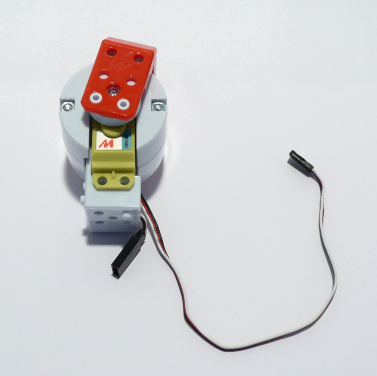
Meccanoid Servos are available from Meccano. They contain a servo motor and an LED, which are treated as separate devices by MECControl. The servo motor is able to hold itself at any position over a 180 degree range.

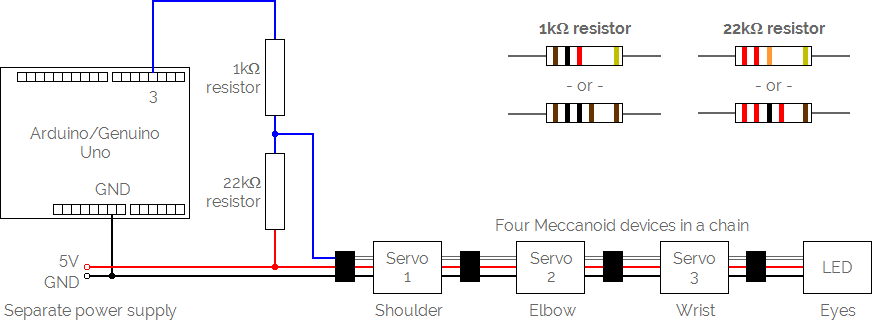
Up to four Meccanoid Servos, or up to three Meccanoid Servos and one Meccanoid LED, may be connected in a chain to any of the digital pins on your Arduino/Genuino Uno or Mega, labelled 2-13 on the Uno and 2-53 on the Mega, as shown in this example:

A Meccanoid Servo is identified by its position in the chain, with position 1 being the servo nearest to the pin.
If you are connecting several Meccanoid devices to your Arduino/Genuino Uno or Mega, you will probably need to power them from a separate 5V DC regulated power supply. When adding Meccanoid devices to an existing chain, always turn the power off and on again (and press the Reset button on your Arduino/Genuino Uno or Mega) to allow them to be initialised.
Once a chain of Meccanoid devices is connected to your Arduino/Genuino Uno or Mega, use the Connect command to give each one a name, tell MECControl which pin it is connected to, and tell MECControl its position in the chain:
Connect Shoulder MeccanoidServoMotor To Pin 3.1
Connect Elbow MeccanoidServoMotor To Pin 3.2
Connect Wrist MeccanoidServoMotor To Pin 3.3
In this example, three MeccanoidServoMotors named Shoulder, Elbow and Wrist have been connected in chain positions 1, 2 and 3 to the digital pin labelled 3. You can then refer to the servos by name in later commands, as in this example:
Move Shoulder Clockwise To 90 Degrees
This command moves the Shoulder servo Clockwise to the 90 degree position, as far as it can go. You could just as easily move the servo Counterclockwise, or to the Centre:
Move Shoulder Counterclockwise To 45 Degrees
Move Shoulder To Centre
You can also refer to an angle stored in a previously defined variable:
Move Shoulder Counterclockwise To Angle Degrees
Servos can move from their current position to another smoothly over a given period of time:
Move Shoulder Clockwise To 90 Degrees Over 5 Seconds
The time period can be anything from 0.1 to 60 seconds, in 0.1 second increments.
You can also refer to a time period stored in a previously defined variable:
Move Shoulder Clockwise To 90 Degrees Over Time Seconds
Sometimes it is useful to give the servo actions names that mean something in the context of your project.
You can do this by adding named Actions to the end of the Connect command:
Connect Shoulder MeccanoidServoMotor To Pin 3.1 Actions Up Down
Now these actions can be used with the Move command:
Move Shoulder Up To 10 Degrees
MECControl won’t wait for the action to complete, but you can use a Wait command to pause the sequence:
Move Shoulder Up To 10 Degrees
Wait For 2 Seconds
Relative movement
The By command samples the actual position of the servo before adding or subtracting the angle you specified:
Move Shoulder Clockwise By 10 Degrees
Disabling servos
A Meccanoid Servo normally holds itself at the position set by the last Move command.
To allow the servo to move freely, you can use the Disable command:
Disable Shoulder
Servo properties
The Position property of a Meccanoid Servo ranges from -90 degrees when the servo is fully counterclockwise, to +90 degrees when the servo is fully clockwise.
You can access it from any Jump, Let or Wait command, as in this example:
Wait For Shoulder Position > 45 Degrees
When this Wait command is played, sequence playback will be paused until the Position of the Shoulder servo is greater than 45 degrees clockwise.