Motors
Motors cannot be directly connected to your Arduino/Genuino Uno or Mega for several reasons:
- They generally require a higher voltage and current than the Arduino/Genuino Uno or Mega can supply.
- The counter-electromotive force produced in their coils would damage the Arduino/Genuino Uno or Mega.
- The Arduino/Genuino Uno or Mega would not be able to run them in both directions.
A circuit called an H bridge can be used to solve all of these problems. MECControl is able to control H Bridge circuits that require one input (for uni-directional motor control) or two or three inputs (for bi-directional motor control).
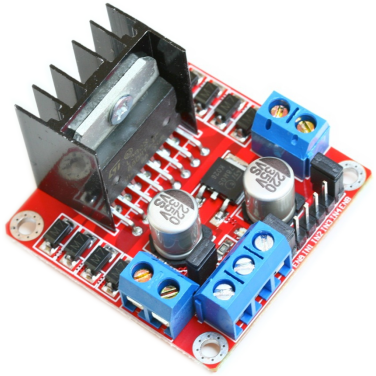
One of the most popular H bridge circuits is based on the L298 integrated circuit. It contains two identical H bridges, allowing you to control up to two motors consuming up to 2A each at a voltage from 7.5V to 46V DC.
While you could build your own L298 H bridge circuit, it is cheaper and easier to buy a ready-built module. The examples below assume the use of such a module running from a 12V DC power supply, along with a 12V motor.
Motors generate electrical noise, which may cause other components such as your Arduino/Genuino Uno or Mega to behave erratically. To stop this happening, connect a 0.1µF ceramic capacitor (µF is pronounced ‘micro-Farad’) between each motor’s terminals, as shown in the examples below. (You may find though that your motors already have a capacitor or three fitted.)
If your Arduino/Genuino Uno or Mega still behaves erratically, you may need to connect an additional two 0.1µF ceramic capacitors between each motor’s terminals and its casing, as shown with dotted wires in the examples below.
Uni-directional motors
If you only need to run your motor in one direction, it can be connected to your Arduino/Genuino Uno or Mega and L298 H bridge module using either of the H bridges, A or B, as shown in these examples:
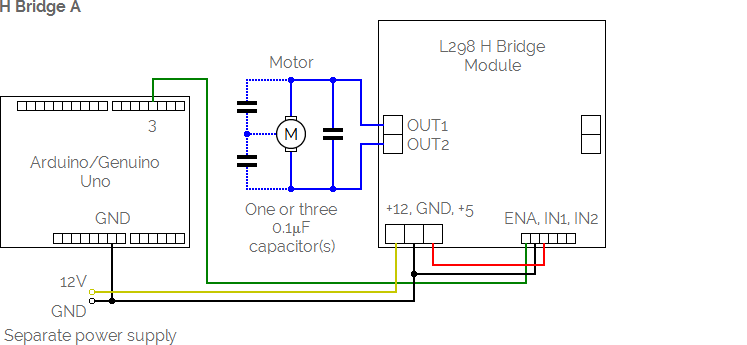
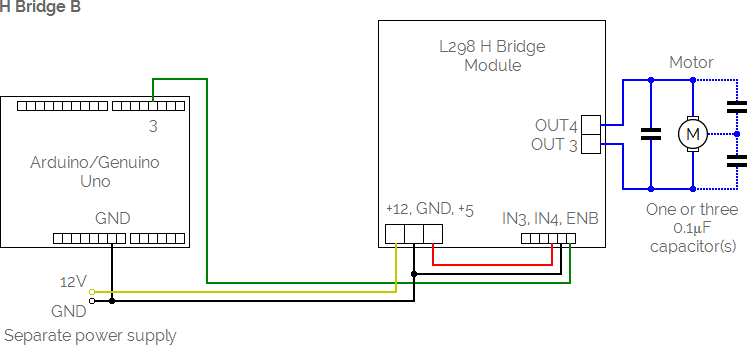
The Enable input (ENA or ENB) from the module can be connected any of the digital pins on your Arduino/Genuino Uno or Mega, labelled 2-13 on the Uno and 2-53 on the Mega. However, if you wish to control the speed of your motor, it must be connected to digital pin 3, 5, 6, 9, 10 or 11 on the Uno or digital pin 2-13 or 44-46 on the Mega.
Once your motor is connected to your Arduino/Genuino Uno or Mega via an L298 H bridge module, use the Connect command to give it a name and tell MECControl which pin it is connected to:
Connect Engine Motor To Pin 3
In this example, a Motor named Engine has been connected via the digital pin labelled 3.
You can then refer to the motor by name in later commands, as in this example:
Run Engine
This command runs the Engine motor at full speed.
For motors with Enable inputs connected to digital pins 3, 5, 6, 9, 10 or 11 on the Arduino/Genuino Uno, or digital pins 2-13 or 44-46 on the Arduino/Genuino Mega, speed can be specified as a percentage:
Run Engine At 10 Percent
You can also refer to a speed level stored in a previously defined variable:
Run Engine At Speed Percent
Bi-directional motors
If you need to run your motor in both directions, it can be connected to your Arduino/Genuino Uno or Mega and L298 H bridge module using either of the H Bridges, A or B, as shown in these examples:
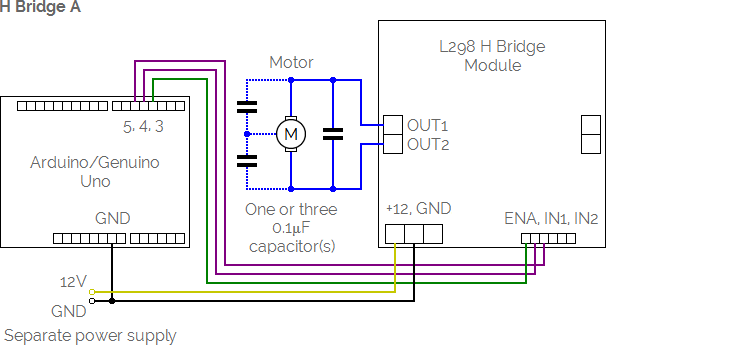
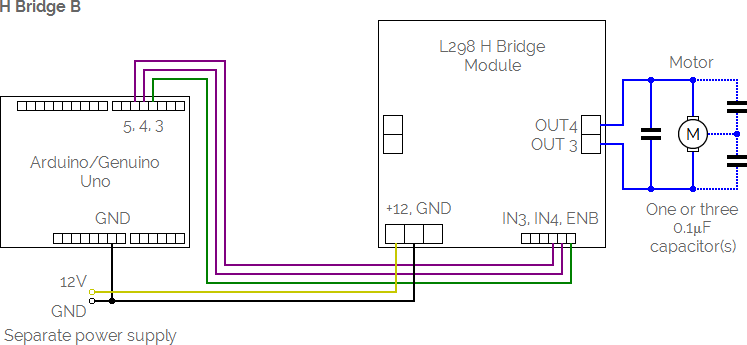
The Enable input (ENA or ENB) from the module can be connected any of the digital pins on your Arduino/Genuino Uno or Mega, labelled 2-13 on the Uno and 2-53 on the Mega. However, if you wish to control the speed of your motor, it must be connected to digital pin 3, 5, 6, 9, 10 or 11 on the Uno or digital pin 2-13 or 44-46 on the Mega.
Once your motor is connected to your Arduino/Genuino Uno or Mega via an L298 H bridge module, use the Connect command to give it a name and tell MECControl which pins it is connected to:
Connect Wheels Motor To Pins 3, 4, 5
In this example, a Motor named Wheels has been connected via the digital pins labelled 3, 5 and 6. The pins do not need to be consecutive, though if they are they can also be specified as a range:
Connect Wheels Motor To Pins 3-5
You can then refer to the motor by name in later commands, as in this example:
Run Wheels Clockwise
This command runs the Wheels motor Clockwise at full speed. You could just as easily run the motor Counterclockwise:
Run Wheels Counterclockwise
For motors with Enable inputs connected to digital pins 3, 5, 6, 9, 10 or 11 on the Arduino/Genuino Uno, or digital pins 2-13 or 44-46 on the Arduino/Genuino Mega, speed can be specified as a percentage:
Run Wheels At 10 Percent Clockwise
You can also refer to a speed level stored in a previously defined variable:
Run Wheels At Speed Percent Clockwise
Sometimes it is useful to give the motor actions names that mean something in the context of your project.
You can do this by adding named Actions to the end of the Connect command:
Connect Wheels Motor To Pins 3-5 Actions Forward Reverse
Now these actions can be used with the Run command:
Run Wheels At 20 Percent Forward
Using H Bridge circuits that require two inputs
If your H Bridge circuit only requires Enable and Direction inputs, you can specify just two pins in the Connect command:
Connect Wheels Motor To Pins 3, 4
The Enable input (ENA or ENB) from the module can be connected any of the digital pins on your Arduino/Genuino Uno or Mega, labelled 2-13 on the Uno and 2-53 on the Mega. However, if you wish to control the speed of your motor, it must be connected to digital pin 3, 5, 6, 9, 10 or 11 on the Uno or digital pin 2-13 or 44-46 on the Mega.
Accelerating and decelerating motors
Motors with Enable inputs connected to digital pins 3, 5, 6, 9, 10 or 11 on the Arduino/Genuino Uno, or digital pins 2-13 or 44-46 on the Arduino/Genuino Mega, can accelerate or decelerate from their current speed to another over a given period of time:
Accelerate Wheels To 60 Percent Forward Over 5 Seconds
The time period can be anything from 0.1 to 60 seconds, in 0.1 second increments.
You can also refer to a time period stored in a previously defined variable:
Decelerate Wheels To 10 Percent Forward Over Time Seconds
MECControl won’t wait for the action to complete, but you can use a Wait command to pause the sequence:
Accelerate Wheels To 60 Percent Forward Over 5 Seconds
Wait For 5 Seconds
Stopping motors
You can stop a motor immediately with the Stop command:
Stop Wheels
Motors with Enable inputs connected to digital pins 3, 5, 6, 9, 10 or 11 on the Arduino/Genuino Uno, or digital pins 2-13 or 44-46 on the Arduino/Genuino Mega, can decelerate from their current speed to a stop over a given period of time:
Stop Wheels Over 5 Seconds
The time period can be anything from 0.1 to 60 seconds, in 0.1 second increments.
You can also refer to a time period stored in a previously defined variable:
Stop Wheels Over Time Seconds