LEDs
LEDs (Light Emitting Diodes) have many advantages over traditional lamps — most run at a low voltage (around 2V), draw a low current (around 20mA), do not get hot, and last practically forever.
While LEDs are available in a vast variety of packages, sizes and colours, the easiest to use are standard 3mm or 5mm diameter types with leads that can be easily inserted into breadboard pinholes, like these below:
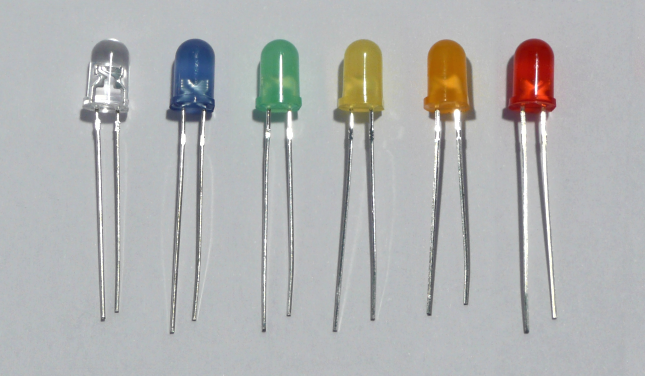
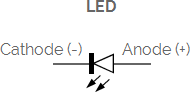
Notice that one lead is longer than the other — this is the positive lead, or anode. The other lead, which is also marked by a slight flat area on the plastic case of the LED, is the negative lead, or cathode. Connecting an LED the wrong way around won’t damage it — it just won’t light up.
LEDs can be connected to any of the digital pins on your Arduino/Genuino Uno or Mega, labelled 2-13 on the Uno and 2-53 on the Mega. However, if you wish to control the brightness of your LEDs, they must be connected to digital pins 3, 5, 6, 9, 10 or 11 on the Uno or digital pins 2-13 or 44-46 on the Mega.
Connecting LEDs
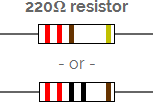
LED packages contain one or more LED chips of different colours. In the examples below, each LED chip has its own 220Ω current-limiting resistor (Ω is pronounced ‘Ohm’) which protects both it and your Arduino/Genuino Uno or Mega from damage due to excessive current draw.
Uni-colour LEDs
Standard packages that contain a single LED chip have two leads and can be connected to your Arduino/Genuino Uno or Mega as shown in this example:
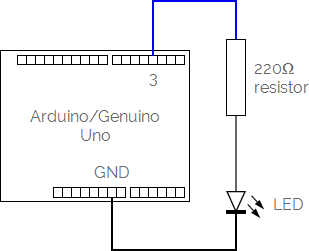
Once your LED is connected to your Arduino/Genuino Uno or Mega, use the Connect command to give it a name and tell MECControl which pin it is connected to:
Connect Status LED To Pin 3 With Action Red
In this example, an LED named Status has been connected to the digital pin labelled 3.
The Action tells MECControl that Red is the colour that the LED package is capable of producing.
Tri-colour LEDs
Some packages contain two LED chips. If the LED chips are red and green, yellow light is produced when both are lit.
These packages can have two or three leads — only the three-leaded packages are supported by MECControl.
They can be connected to your Arduino/Genuino Uno or Mega as shown in this example:
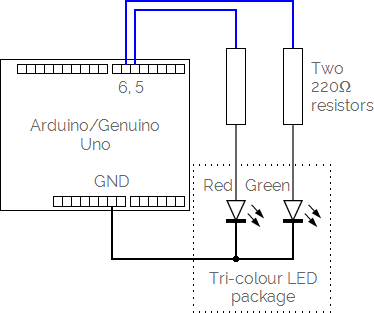
Once your LED is connected to your Arduino/Genuino Uno or Mega, use the Connect command to give it a name and tell MECControl which pins it is connected to:
Connect Status LED To Pins 5, 6 With Actions Red Green Yellow
In this example, an LED named Status has been connected to the digital pins labelled 5 and 6. The pins do not need to be consecutive, though if they are they can also be specified as a range:
Connect Status LED To Pins 5-6 With Actions Red Green Yellow
The Actions tell MECControl that Red, Green and Yellow are the colours that the LED package is capable of producing.
Full-colour LEDs
Some packages contain three LED chips — red, green and blue. In theory these can produce light of any colour when combined, including white.
They can be connected to your Arduino/Genuino Uno or Mega as shown in this example:
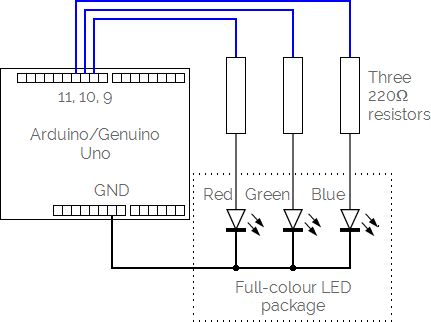
Once your LED is connected to your Arduino/Genuino Uno or Mega, use the Connect command to give it a name and tell MECControl which pins it is connected to:
Connect Status LED To Pins 9, 10, 11
In this example, an LED named Status has been connected to the digital pins labelled 9, 10 and 11. The pins do not need to be consecutive, though if they are they can also be specified as a range:
Connect Status LED To Pins 9-11
LEDs with Common Anodes
Most tri-colour and full-colour LED packages have a common cathode, or negative, lead. If your LED package instead has a common anode, or positive, lead, it can be connected to your Arduino/Genuino Uno or Mega as shown in this example:
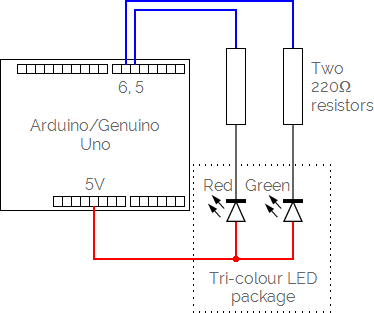
Because this LED package has a common anode, the digital pins labelled 5 and 6 must be used as a Current Sink:
Connect Status LED To Pins 5-6 As Current Sink With Actions Red Green Yellow
Lighting LEDs
Once connected, an LED can then be referred to by name in later commands, as in this example:
Light Status
This will light the Status LED in its default colour. You can also choose the colour you desire, if the LED supports it:
Light Status Red
Light Status Yellow
Light Status White
Light Status Black
A full-colour LED can be lit Black, Red, Green, Blue, Magenta, Yellow, Cyan, Purple, PaleGreen, PaleBlue, Orange, Pink or White.
For LEDs connected to digital pins 3, 5, 6, 9, 10 or 11 on the Arduino/Genuino Uno, or digital pins 2-13 or 44-46 on the Arduino/Genuino Mega, brightness can be specified as a percentage:
Light Status 10 Percent Red
You can also refer to a brightness level stored in a previously defined variable:
Light Status Brightness Percent Red
Fading LEDs
LEDs connected to digital pins 3, 5, 6, 9, 10 or 11 on the Arduino/Genuino Uno, or digital pins 2-13 or 44-46 on the Arduino/Genuino Mega, can fade from their current colour to another over a given period of time:
Fade Status To Green Over 2 Seconds
The time period can be anything from 0.1 to 60 seconds, in 0.1 second increments.
You can also refer to a time period stored in a previously defined variable:
Fade Status To Green Over Time Seconds
MECControl won’t wait for the fade to complete, but you can use a Wait command to pause the sequence:
Fade Status To Green Over 2 Seconds
Wait For 2 Seconds