Solenoids
Solenoids and electromagnets cannot be directly connected to your Arduino/Genuino Uno or Mega for several reasons:
- They generally require a higher voltage and current than the Arduino/Genuino Uno or Mega can supply.
- The counter-electromotive force produced in their coils would damage the Arduino/Genuino Uno or Mega.
A circuit called an H bridge can be used to solve all of these problems.
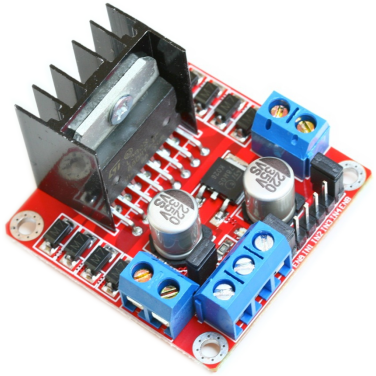
One of the most popular H bridge circuits is based on the L298 integrated circuit. It contains two identical H bridges, allowing you to control up to four solenoids consuming up to 2A each at a voltage from 7.5V to 46V DC.
While you could build your own L298 H bridge circuit, it is cheaper and easier to buy a ready-built module. The examples below assume the use of such a module running from a 12V DC power supply, along with a solenoid having a 12V coil.
Solenoids generate electrical noise, which may cause other components such as your Arduino/Genuino Uno or Mega to behave erratically. To stop this happening, you may need to connect a 0.1µF ceramic capacitor (µF is pronounced ‘micro-Farad’) between each solenoid’s coil terminals, as shown with dotted wires in the examples below.
Connecting solenoids
Solenoids can be connected to your Arduino/Genuino Uno or Mega and L298 H bridge module using any of the inputs and outputs, as shown in these examples:
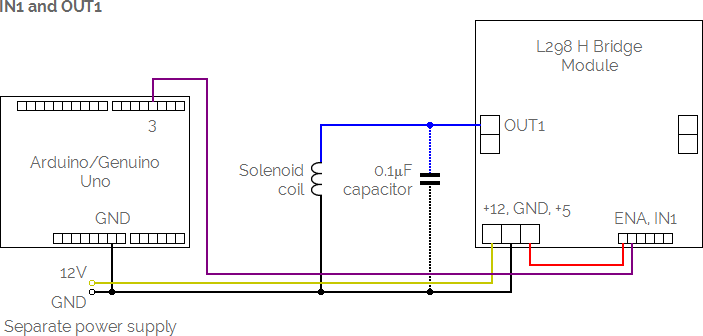
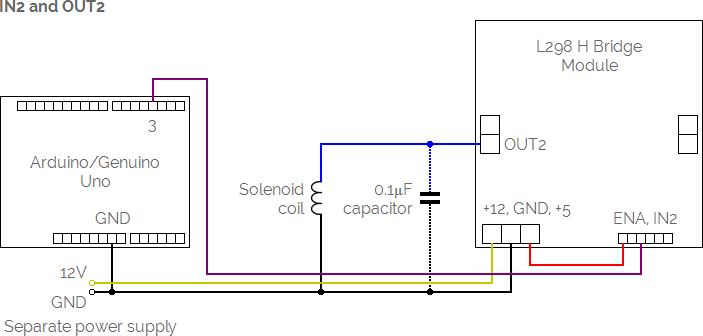
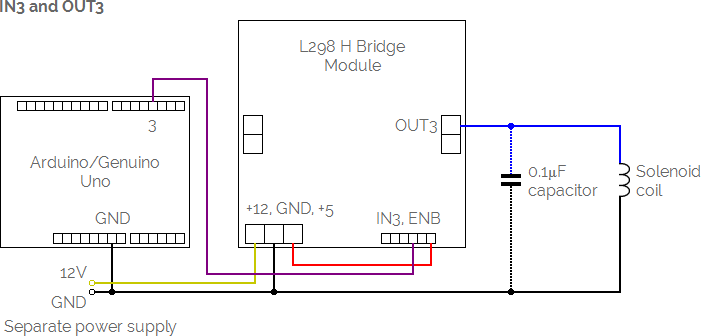
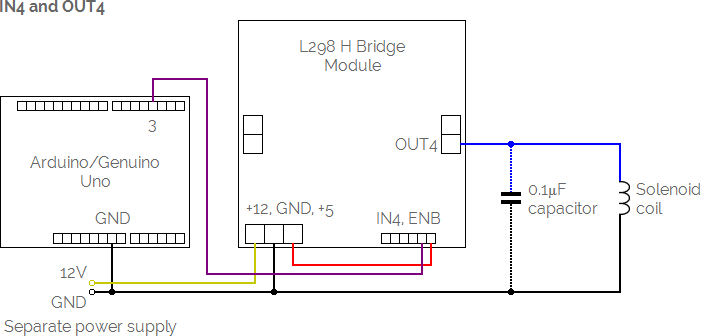
The input (IN1, IN2, IN3 or IN4) from the module can be connected any of the digital pins on your Arduino/Genuino Uno or Mega, labelled 2-13 on the Uno and 2-53 on the Mega.
Once your solenoid is connected to your Arduino/Genuino Uno or Mega via an L298 H bridge module, use the Connect command to give it a name and tell MECControl which pin it is connected to:
Connect Latch Solenoid To Pin 3
In this example, a Solenoid named Latch has been connected via the digital pin labelled 3.
You can then refer to the solenoid by name in later commands, as in this example:
Activate Latch
This will activate the Latch solenoid. The following command will deactivate it:
Deactivate Latch